Ouchi gari or major inner reap throw is one of the most popular throws in judo and yet very simple to execute.
Ouchi gari doesn’t include all the complications of the other judo throws, which makes it an easy throw to learn for beginners.
In this article, you will learn everything you need to know about Ouchi gari.
But before getting to our step-by-step guide, take a look at this highlight of Ouchi gari throws to see what we are going to demonstrate.
Step-by-step guide to Ouchi gari
Like all judo throws, Ouchi gari has many variations, in this guide we are going to break down the classic and most basic Ouchi gari.
1. Kumi kata or grip fighting
For Ouchi gari, there are several ways to grip your opponent, the most basic grip is this one:
One hand gripping the lapel of the opponent
The other hand gripping under the bicep or tricep sleeve
2. One-step entry Vs. Two-step entry
Footwork is essential for a successful Ouchi gari.
In order to execute an Ouchi gari, there are two methods to enter:
A. One-step entry
This is the simplest and easiest entry. Let’s assume that you want to throw your opponent using your right leg, all you have to do is to take one step with your left leg towards your opponent and you will be in full range to initiate your throw.
The one-step entry is used:
When you are very close to your opponent and all you need is to take one step
When your opponent advances and closes distance and you want to counter
When an opportunity presents itself and you need to react quickly.
In some cases, you don’t even need to take a step. take a look at this example:
B. Two-step entry
The two-step entry is widely used amongst high-level judo competitors because of its effectiveness and high success rate.
This two-step entry is used when your opponent is out of range.
Let’s assume again that you want to throw your opponent using your right leg.
Step with your right foot towards your opponent right foot
Pivot on your right foot and turn your right hip towards your opponent
Bring that left foot behind your right foot.
Now, you should be sideways, your right hip should be close to your opponent’s midsection.
Here is a live example of the two-step entry.
Why is it better to use the two-step entry?
The two-step entry is much more effective than the one-step entry. Why?
When the hips rotate and you are sideways, you have more leverage for the leg reap. You can go deep with your leg behind your opponent’s leg to trip them, you can even wrap your leg around theirs and trap them.
Also, a two-step entry will give you the possibility to switch to an Uchi mata in case your opponent resists your Ouchi gari.Combinations of throws are a big game in judo, the main difference between a low level and a high-level judo player is the combo game. High-level judo matches are full of combos and traps and strategies just like a chess game.
3. Turn to face your opponent
Once you have made your entry, don’t stay sideways, the sideway stance is just a transition. If you stay facing away, you will be easily countered.
Turn and face your opponent belly on belly.
Keep in mind that the transition between these positions must be flawless and smooth without you think about each step.
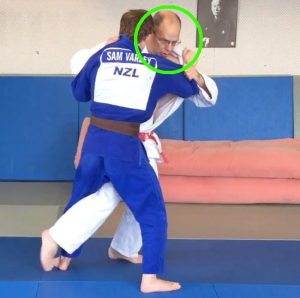
4. Head over the opposite shoulder of the reaping leg
Let’s keep assuming that you want to throw your opponent using your right leg. In that case, your head must be over your opponent’s right shoulder and vice versa. If you keep your head on the same side as the reaping leg, you will be put out of balance easily and get countered.
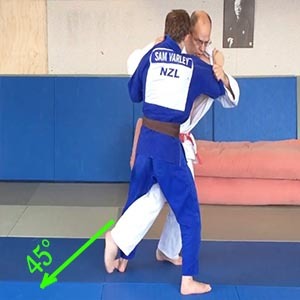
5. Direction of the throw
You shouldn’t be throwing your opponent straight backward. Ouchi gari is a diagonal throw,you should throw your opponent in a 45-degree angle.
Why?
It happens often that when you execute an Ouchi gari and push the opponent backward they resist by regaining balance with their free supporting leg, that is why you have to switch your push to a 45-degree angle toward the trapped leg.
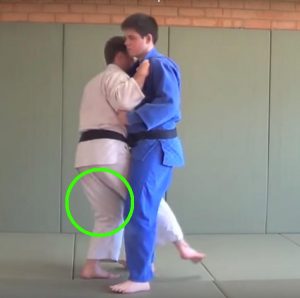
6. Bend your knees slightly
Once your body is against your opponent’s body, bend your knees slightly. If you keep your legs straight you won’t be able to go deep with the reaping leg, also, you will risk kneeing your opponent on the groin and get disqualified, because you will have to lift your knee to create leverage.
7. Reap the leg
Now that you have made all the necessary steps to set up your opponent for the throw, it’s time to put the final touch. It’s very simple, put your calf behind your opponent’s calf.
8. Twist the upper body
Reaping the leg is generally enough, but a good Ouchi gari must be tight and perfect and must leave no chance for the opponent to recover balance. When executing the leg reap, twist your opponent’s upper body toward the 45-degree angle of the reaped leg. Your twist must be combined with a push, always to the same angle.
9. Stay standing Vs. Falling over the opponent
Sometimes, you catch your opponent with a clean Ouchi gari where you drop them on their backside without having to drive all your weight behind the throw, you can just drop them and stay standing.
Other times, you may face resistance and you have to adjust and put all your weight behind the throw until you fall over your opponent. It depends on the situation, just keep in mind that no matter what, the job has to be done.
Watch former UFC champion Ronda Rousey teaching Ouchi gari
Great combinations of Ouchi gari
1. Ouchi gari to Uchi mata
One of the greatest combinations is when your Ouchi gari gets complicated and your opponent resists it and shifts their weight to the opposite angle. That’s when another great opportunity presents itself, switch from Ouchi gari to Uchi mata.
2. Ouchi gari to Osoto gari
Sometimes the opponent outsteps your leg reap, they lift their leg high to avoid getting caught in a leg reap. Once your opponent outsteps you, they become standing on one leg, that’s when you have to switch to an Osoto gari. Great combo!