Uki goshi is a hip throwing technique in judo, it is one of the basic throws that students learn in judo classes in the first couple of months.
Many judo beginners confuse Uki goshi with O goshi thinking that they are the same technique, although they belong to the same family of hip throwing techniques they are two different throws.
We have dedicated a full article explaining the differences between Uki goshi and O goshi, check it here.
In this article, you will learn: How to do Uki goshi (step-by-step guide)
How to do Uki goshi (step-by-step guide)
Important note: In this guide, we have broken down this throw into several steps. This does not mean that you have to execute each step separately, sometimes you have to execute several steps simultaneously.
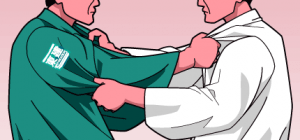
1. Start with a good grip (Kumi kata)
All the instructions below are given with the assumption that you are right-handed and you are executing Uki goshi using your right hip, if you are left-handed, just reverse the grips.
Start with the standard grip that works for most judo throws:
With your right hand, grip the lapel
With your left hand, grip the sleeve from the elbow or the tricep
Kumi kata (grip fighting) is a whole game by itself, don’t be predictable with your grips, change grips constantly and prevent your opponent from getting a dominant grip.
Also, mix your grip fighting with footwork to confuse your opponent and prevent them from anticipating what throw is coming.
2. Put your opponent off-balance (Kuzushi)
There is a critical phase that you have to pass through for most judo throws, which is Kuzushi or off-balancing the opponent.
You shouldn’t attempt to toss your opponent without setting them up and putting them slightly off-balance on their toes with their upper body leaning forward.
How:
1. Use the lapel grip to elevate your opponent off the ground: tighten your grip, make a strong fist, and press your forearm against your opponent’s chest. Now push upward as if you want to deliver an uppercut. This “uppercut” motion will elevate the opponent slightly off the ground
2. Use the sleeve grip to pull the opponent’s arm upward and toward you. The upward pull will help to elevate the opponent while the pull toward you will help to put them on their toes which makes them slightly out of balance and more vulnerable to getting thrown.
3. When you pull their arm upward and toward you, turn the back of your fist to face you and the palm of your hand to face away. The motion should look as if you want to check your watch.
4. Follow your imaginary “watch” with your eyes, your head will turn slightly (this will prepare you for the upcoming steps)
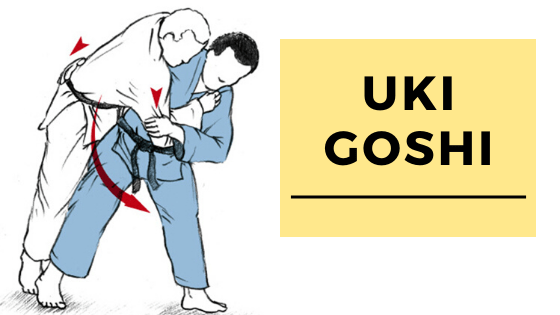
3. Arm around the waist
The arm around your opponent’s waist will be your main mechanism for the toss.
1. Release the lapel grip and go with the same hand under your opponent’s arm
2. Wrap your arm around your opponent’s waist. Go as far as possible, the deeper your arm goes the more successful and secure the throw will be. If you can go to the far hip then it’s great, if your arm isn’t very long, you can go for the back of the belt or just grab the lower back by the gi.
3. Your arm wrapping must be strong and solid to prevent the opponent from squatting down and escaping the throw. Your grip must be strong enough to keep your opponent standing straight.
Sometimes you may face an opponent who tends to keep their elbows close to their body to prevent any sort of underhook. A good way to get the underhook is by faking an overhook, you can also fake grabbing them from the shoulder, do that once or twice until you create a pattern in your opponent’s mind and until they start thinking that they have figured out your next move, once you feel that, go under the arm.
4. Step in and pivot
Note that this step and the previous step should both be executed simultaneously:
1. Take a step with your right foot to the center of your opponent’s stance
2. Pivot on your right foot 120°-135°. This is the trickiest part of Uki goshi, and this is the part where students confuse it with O goshi.
In Uki goshi you shouldn’t make a 180° turn as in O goshi, Uki goshi is a half-hip throw. Only one hip should make contact with the opponent, while in O goshi your back must be completely glued to the opponent’s belly.
3. Now that you have made the pivot, step with your left foot outside your opponent’s stance. Your right foot should be positioned slightly forward. Your feet shouldn’t be parallel with your opponent’s feet. Your left foot should be slightly forward.
If your feet are parallel to your opponent’s feet, it means that you have made a full 180° pivot, which is wrong. Your pivot shouldn’t be more than 135°.
In this example, the judoka is following the same instructions to the letter, except that he is left-handed
5. Hip glued, no space left
By now, your right hip should be glued to your opponent’s left hip or belly.
Don’t make the mistake of leaving space between yourself and your opponent, you should make one entity with your opponent’s body in order to be able to manipulate their weight.
6. Wheel your opponent
Now is the time for the fun part: the throwing.
This is another step where beginners confuse Uki goshi with O goshi, Uki goshi doesn’t require lowering the hip level by bending the knees and squatting as in O goshi.
Also, Uki goshi doesn’t require lifting the opponent and loading them on the back as in O goshi.
Notice how he squats and lifts his opponent on the back for O goshi
Instead, Uki goshi uses a wheeling mechanism where the hip is the fulcrum of the throw:
Keep your legs relatively straight, or keep them bent to the minimum
Use your right arm (the arm you have around your opponent’s waist) to pull your opponent’s upper body against your right hip.
Use the sleeve grip to pull the opponent’s arm to the ground
This will make your opponent wheel over your hip and your hip will be the fulcrum of the throw.
Notice how he wheels his opponent with straight legs for Uki goshi
7. Follow through
Don’t make the mistake of releasing all the grips once your opponent is on the ground
Release the grip you have around the waist
Your opponent must fall in front of you with their arm between your legs
Maintain the sleeve grip and grab the arm with both hands