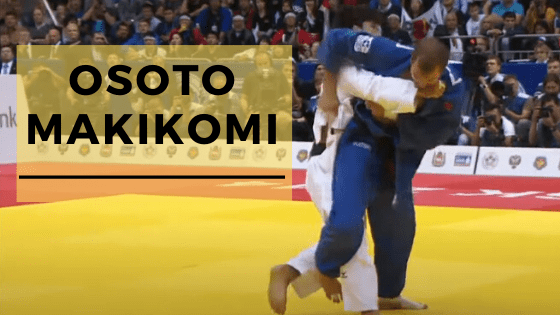
Osoto makikomi is a side sacrifice throw used in judo, it is often confused with Soto makikomi. Both techniques belong to the same family of side sacrifice throws, but they are two different techniques.
Osoto makikomi
If you want to learn more about Soto makikomi, check it here, we have dedicated a full step-by-step guide to it.
Soto makikomi
In this article, you will learn: How to do Osoto makikomi: Step-by-step guide
How to do Osoto makikomi: Step-by-step guide
Important note: In this guide, we have broken down this throw into several steps. This does not mean that you have to execute each step separately, sometimes you have to execute several steps simultaneously.
1. Understand the mechanism of how Osoto makikomi works
If you want to learn how to do Osoto makikomi, where and when to use it, you must first understand the mechanism of how it works.
The name of the throw will give you a big hint of how it works, the translation of Osoto makikomi is “big outer wraparound”. “maki” means “wrapping” and “komi” means “applying around”.
So basically, the throw consists of taking control of the opponent’s arm, trapping it, then spinning around as if you want to wrap a sheet around you. When you take the arm and do the spinning, the opponent’s body follows their trapped arm, and that’s how they fall on the ground.
2. Combine Osoto makikomi with Osoto gari
Osoto makikomi is a throw that works best when it is combined with other judo throws. It can work as a single technique, but its mechanisms work best when it is combined with other throws.
One of the best throws to use in combination with Osoto makikomi is Osoto gari (If you don’t know how to do a proper Osoto gari check out our detailed step-by-step guide)
How:
Once you attempt an Osoto gari and you notice considerable resistance from your opponent, switch to Osoto makikomi.
Notice how the judoka attempts an Osoto gari first then goes to Osoto makikomi
Feint and fake
Note that your Osoto gari attempt doesn’t have to be real, you can fake it without having to engage your whole body in it.
Judo is a game of deception, you have to fake and bluff to create patterns in your opponent’s head.
When you feint once or twice, you program a pattern in your opponent’s mind, they start thinking that they have analyzed you and figured out your upcoming move, their reaction to your feints becomes automatic. Once you notice that, hit them with Osoto makikomi and surprise them.
Osoto makikomi has the same entry as Osoto gari, so your opponent won’t be able to tell which one you are going to use.
3. What grip to use? (Kumi kata)
As explained in the first step, taking the arm is essential to the success of the throw, all your focus must be on taking the arm.
Start with the basic grip for Osoto gari:
One hand should be gripping the elbow from the sleeve
The other hand should be gripping the lapel
4. Trap the arm
These instructions are given assuming that you will use your opponent’s right arm for the throw, if you want to use their left arm, just reverse the instructions below:
After faking Osoto gari, now switch to Osoto makikomi
Release the lapel grip
Now use your free right arm to go above your opponent’s right arm. Your opponent’s right shoulder should be under your armpit. If you are shorter than your opponent and you can’t get their shoulder under your armpit, it is okay to have their upper arm under your armpit. Just remember, the higher you go on the arm the more successful the throw will be.
Now that you have your opponent’s arm or shoulder under your armpit, press your elbow against your body to trap the arm in-between.
I often explain it to my students by saying this “hold onto your opponent’s arm as if you are drowning and their arm is your only rescue, don’t let it slip from you”.
It is worth mentioning that some judokas don’t use the last step of “pressing the elbow against the body”, they prefer to extend their arm in the air to direct the throw and decrease the impact when they hit the ground. This is also valid and it works, because the opponent’s arm is still trapped by the sleeve grip.
Here is an example of extending the arm in the air
I prefer teaching my students to have full control over the arm with elbow trapping because in high-level judo competitions, it is only a matter of inches and your opponent may slip out and counter you.
5. Direction of the throw
We have already explained in step number 2 that you have to combine Osoto makikomi with Osoto gari. Osoto gari is a throw applied directly forward -the opponent falls backward-, so when you attempt it, the opponent will push forward to prevent falling on their back.
On the other hand, Osoto makikomi goes to the side, so if you want to throw your opponent using their right arm, you have to go to your left side.
Now that you know each throw’s direction, you can switch from Osoto gari to Osoto makikomi easily, so once you feel your opponent resisting your Osoto gari by pushing forward, switch to Osoto makikomi and go to your left side
6. Wrapping the upper body and reaping the leg
Now is the time to apply the “makikomi” part, which is wrapping your opponent’s body around your own body.
Turn your right shoulder to the left and start spinning
Take the opponent’s arm with you and spin with it in the air
Remember the leg reap you used to fake Osoto gari? Now is the time it comes in handy for Osoto makikomi, apply a leg reap to trip your opponent. Now there are two opposite forces in play, one spinning upstairs (your upper body), the other tripping the leg downstairs (the leg reap)
When you hit the ground you must be looking at the opposite side
7. Follow through
Once you are on the ground on top of your opponent, make sure to pin them using your upper back or shoulder. You must keep control of the arm to prevent them from escaping or reversing you.
A common technique that judokas use after a successful Osoto makikomi is Kesa gatame.