Te Guruma is a judo throw also known as the hand wheel. It was banned, amongst other throws, by the International Judo Federation (IJF) for being a leg grabbing technique.
Although it is a banned technique in judo competitions, I still teach it to my students for self-defense and out-of-competition sparring.
In this article, you will learn: How to do Te Guruma (step-by-step guide)
How to do Te Guruma (step-by-step guide)
Important note: In this guide, we have broken down this throw into several steps. This does not mean that you have to execute each step separately, sometimes you have to execute several steps simultaneously.
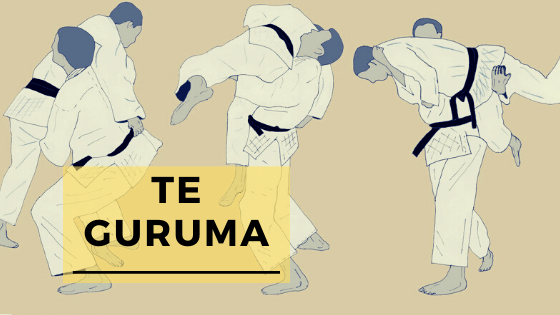
1. What grip to use (Kumi Kata)
There are many ways to grip your opponent for Te Guruma, but to spare you the confusion, you must have two mechanisms in order to execute a successful Te Guruma:
One arm should be under the groin area to lift the body
The other hand should be gripping the upper body to stabilize and direct the throw
Now that you have a solid idea about the mechanisms of the grip, let’s take a look at the possible grips:
One hand on the lapel, the other hand under the groin area
One hand above the shoulder, the other hand under the groin area
One hand gripping the tricep, the other hand under the groin area
One hand gripping the sleeve, the other hand under the groin area
One hand gripping the back of the gi, the other hand under the groin area
As you may have noticed, the hand under the groin area is the pillar of all grips, then the upper body grip comes in second.
2. Duck under
In order to execute a successful Te Guruma, you have to be under your opponent’s armpit, your head must be behind your opponent.
How to duck under your opponent?
Start by having a standard judo grip (One hand grabbing the lapel, the other hand grabbing the sleeve)
Use the sleeve grip to lift your opponent’s arm
Now lower your level and duck under your opponent’s arm
3. Control your opponent’s side
Te Guruma is not a throw done while you are standing in front of your opponent, your chest must be facing your opponent’s side.
How:
When you duck under (as explained in step number 2) turn your chest to face your opponent’s side.
Turn your head and rest your cheek on your opponent’s back.
Notice how the blue gi judoka controls the side of the white gi judoka
4. Judo Te Guruma Vs. Sambo Te Guruma
Te Guruma in Judo
Most judo instructors teach Te Guruma with “trapping the leg”
How:
Once you move to your opponent’s side:
Trap their leg between your legs. One leg should be in front of your opponent’s leg, the other leg should be placed behind.
Your opponent’s knee should be blocked to avoid any escape or counter-attack.
Te Guruma in Sambo
I advise against the judo way of putting the opponent’s leg between your legs. I prefer to teach Te Guruma as it is taught in sambo.
In sambo, they prefer to step with the lead leg deep between the opponent’s legs with no trapping as if you want to shoot a single leg takedown.
The sambo way is better for many reasons:
A- You may get countered
When you trap the opponent’s leg between your legs as they do in judo, you risk getting countered by a sacrifice throw. There are at least 4 throws that your opponent can counter you with.
B- The opponent’s leg can prevent you from lifting them up
Another reason to avoid doing it the judo way is that the trapped leg might prevent you from lifting your opponent up in the air. All they have to do is to wrap their leg around your leg by doing a foot hook and you will find it much harder to lift them.
In this example, the blue gi competitor hooks the leg of the white gi competitor which makes the throw much more difficult. After several attempts of escaping the hook, the white gi competitor manages to escape the hook and finish the throw.
5. Leave no space
In order to control your opponent’s weight and manipulate it easily, you must both form one entity. Your chest must be stuck and glued to your opponent’s body. Don’t leave any space in-between.
6. Arm under the groin area
This is the part where I see many of my students messing up. When I teach this part I always say “arm under the groin area” not “hand under the groin area”.
You should go deep with your arm under the groin area and hook the groins with your elbow, you will have a strong and solid grip this way.
If you just grip with your hand and fingers, your hold won’t be that strong and you won’t be able to lift your whole opponent’s body.
It could work if your opponent is lighter, but if they are heavy you will have trouble lifting them up with just your hand and fingers.
The second mistake I often see students making is that they grab the thigh. If you grab your opponent’s thigh they will resist your lift with only one move: All they have to do is to lift their leg up and you won’t be able to lift them.
You need to have full control, and the only way to do so is by going with your arm deep under the groin area.
This is the wrong way to lift your opponent
Obviously, things can get chaotic in competition, sometimes it is okay to do Te Guruma with a thigh grip, I often advise my students to get whatever grip they can in competition, but the drills in class have to be done to perfection.
7. Initiate the lift
Now is the time for the spectacular part of the throw: the lift.
Use the groin grip for the lift
Use your quadriceps, glutes, and hamstrings as the main muscles for the lift
Keep a straight back. A round back may put you at risk for a back injury
A straight back will also make your erector spinae muscles work and participate in the lift
When you initiate the lift, raise your head and look at the ceiling, this will help straighten your back (The back follows wherever the head goes, if you look at the ground your back will go automatically round)
Notice how the white gi competitor looks up to the ceiling when he lifts his opponent
8. Steer them in the air
The exact translation of Te Guruma is the hand wheel, so you must steer your opponent in the air and flip them upside down.
How:
You have two grips on your opponent, one on the upper body and the other on the lower body. You must use both grips as opposite forces, the lower body grip should go upward and upper body grip should go downward.
If your wheel is correct, your opponent’s legs should be up in the air and their head should be down close to the ground.
9. Assist your lift with your knee
Sometimes you may face resistance from the opponent, that’s when a good assist from the knee could come in handy.
10. Avoid spiking your opponent
As explained above, Te Guruma requires you to steer your opponent upside down. This does not mean that you should spike them and slam them on the head.
This goes against all martial arts ethics, spiking can cause severe neck and back injuries which may lead to paralysis. When throwing your opponent on the ground, make sure you rotate them so they fall on their shoulders or upper back.