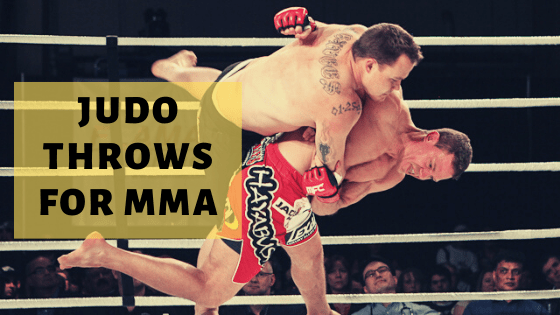
With the success of fighters like Ronda Rousey and Kayla Harrison, judo has clearly established its efficacy in MMA. That being said, judo techniques must be adapted – without a judo gi, i.e. gripping, the fighter has to find control of his opponent some other way, like clinching, to effectively throw.
쉬운 목차
The Basics
Most importantly, all throwing techniques can be broken down into three steps.
Control the opponent’s motion. Control can look as simple as pinning the opponent’s head and arm in a clinch to restrain his motion. But it is more subtle in practice. Punch then take advantage of his reaction to bear hug, etc. A key factor in control is closing the distance to the opponent, since grappling can only take place at about an arm’s length away.
Break the opponent’s balance. A fighter in good control can break balance by forcing his opponent to shift his weight in any direction. The more weight that shifts away from the center of balance, the easier it is to throw. A good rule of thumb is to lead with the head – pull the head forward to throw forward; push the head back to throw backwards; knock the head to the side to throw sideways. Generally, the body follows whether the head goes.
Execute the throw. If the opponent is off balance, throwing should follow naturally. Always follow through. The best opportunity is after the throw when the opponent is vulnerable to additional strikes.
All throws are explained as they would be executed by a right handed fighter, i.e. throwing right-handed.
Harai Goshi (Sweeping Hip Throw)
Harai goshi as seen in MMA closely resembles its form in judo. Control is established by dominating the opponent’s upper body. Often, the fighter has his right arm back around the opponent’s head or under the opponent’s arm, cupping the opponent’s shoulder blade.
Although some fighters manage to throw with one arm, it is always more effective to grab the opponent’s free arm or hand to keep him posting. Once in this position, the fighter steps into his opponent with his right leg to begin the lift. As the fighter takes a second step into his opponent with his left leg, he pivots to turn away from his opponent and sweeps his opponent’s body with his right leg. As the sweep completes, the opponent should slide off the fighter’s right hip. Throughout the pivot and throw, the fighter pulls the opponent’s body toward himself.
Some fighters may find themselves cranking on their opponent’s neck or torso to get the opponent over the hip or feel the need to execute the throw on the balls of their feet. This indicates insufficient lift. When initially stepping into the opponent, the fighter must lower his center of gravity below that of his opponent by bending his knees. The fighter needs to keep his knees bent throughout the turn. They are straightened only as the opponent is tipping over the hip, to add to his falling momentum.
Also note that fighters who successfully execute this throw have good posture throughout the throwing motion. The head, torso, and pivot leg should form a straight line, perpendicular to the ground.
A very similar throw is harai makikomi. Harai makikomi is more of a variation on harai goshi as the only difference is in the gripping. In harai makikomi, the fighter secures the opponent’s arm beneath his armpit
This hara goshi is clearly different from Yoshida’s original judo technique, yet nonetheless effective.
Uchi Mata (Inner Thigh Throw)
Uchi mata is a technique that closely follows the steps of harai goshi. Although there are more subtle differences when observed in judo competition, the difference between these two throws observed in MMA comes down to leg position during execution. Whereas in harai goshi, the leg is swept outside the opponent’s legs, in uchi mata, the leg is swept in between the opponent’s legs.
Like with harai goshi, the fighter needs to lower his center of gravity below his opponent’s, as if to lift the opponent onto his hip as he steps and turns into the throw.
Tai Otoshi (Body Drop)
The mechanics of tai otoshi are similar to harai goshi and uchi mata. Upper body control remains the same. The difference comes in feet positioning. Whereas in harai goshi, the right leg sweeps the opponent’s legs, in tai otoshi, the right foot is planted across the opponent’s legs as if to trip the opponent over with the stretched leg.
The right foot should be planted about a foot farther than shoulder’s width apart. Ideally, the right knee should be bent when planting and straightened as the opponent’s legs are caught by the stretched legs.
On the one hand, because tai otoshi is meant to be applied at a lower level on the body compared to harai goshi, keeping a lower center of balance becomes more important. On the other hand, generating lift is not as crucial. In tai otoshi, the idea is to trip the opponent.
Forward throws like harai goshi and tai otoshi work best when the opponent is leaning forward or stepping towards the fighter.
Osoto Gari (Big Outer Reap)
Another throw that is commonly used is osoto gari. Like the previous two throws, upper body control is key. An efficient way to gain control is to transition from clinch to grabbing the head with the right hand while grabbing the opponent’s arm with the left hand.
The left foot is placed in line with the opponent’s feet. During this step, the left hand pulls toward the hip and the right hand locks down on the opponent’s head, forcing his balance to shift diagonally backwards. The throw is finished when the right leg sweeps the opponent’s legs to take the opponent down on his back.
Another important point is to keep chest to chest contact as much as possible when positioning for the throw. The closer the fighter pulls in his opponent, the heavier he feels to his opponent. The more space the opponent creates, the more likely it is for him to slip out of the technique.
Unlike the previous two throws, osoto gari can be more flexibly applied during the fight. Plenty of fighters feel comfortable throwing osoto gari from the clinch and other positions, as long as they are confident that the opponent can be controlled to move backwards.
Ippon Seoi Nage (One-Armed Shoulder Throw)
Ippon seoi nage is unique in that its adaptation to MMA requires little deviation from its original form (Ippon seoi nage and its variants in judo competition
Unlike other techniques, its setup is specific. Thus it can only be executed in certain situations.
The entry for ippon seoi nage requires the fighter to control one arm of the opponent. The left hand grabs the opponent’s left arm or wrist. (i.e. control the arm closest to the grabbing hand). Lifting the opponent’s arm creates space to turn into the opponent as well as pulls him forward, which shifts the opponent’s weight onto his toes.
While turning into the opponent, the fighter’s knees must be bent. The fighter’s free right arm pins the opponent’s outstretched right arm in his elbow.
At this point, the opponent’s chest should be flush against the fighter’s back. To finish the throw, bow down the head as if to somersault, and turn the right shoulder towards the left knee.
A common mistake is for the fighter to bring the opponent’s arm across his shoulder rather than pinning it between his forearm and bicep. This grip decreases the efficacy of the throw, allowing the opponent to take his arm out and escape.
As with harai goshi and other lifting throws, ippon seoi nage requires the fighter’s center of gravity to be lower than that of his opponent. This leverage is maximized when the opponent is on his toes, leaning over the fighter, while the fighter bends his knees as if to squat.
As the opponent slips over the shoulder, the fighter should extend his knees to add to his opponent’s falling momentum. In judo competition and in MMA, fighters may also collapse to their knees to lower their center of gravity rapidly, and drag their opponent to the ground by turning as if to somersault with the opponent on their back.
Also note that unlike many other throws, ippon seoi nage requires the fighter to turn his back to the opponent with minimal contact with the opponent (i.e. only one arm for control). Given the risks of this position, fighters may have to compensate by practicing to rotate into the throw faster, to minimize the time for counter strikes.
De Ashi Barai / De Ashi Harai (Forward foot sweep)
For any foot sweep, timing is the most important factor that determines success. With the correct timing, physical contact with the opponent is not necessary to throw. For de ashi barai, aim for when the opponent steps backwards
For example, if the opponent is standing staggered, his left foot drawn back and right foot forward, aim to sweep his right foot with your left foot as his right foot lifts to take a step back.
The sweeping foot should be turned so that the base of the foot catches the ankle of the opponent. The sweeping motion should continue for about a shoulder’s width. During this motion, the leg should be kept straight.
Unlike other throws, foot sweeps work best when the fighter has good posture. The non-sweeping foot should be firmly planted so that force is generated from the hip.
Although gripping is unnecessary and often omitted in MMA, fighters may find it easier to execute the throw while pulling down on the arm of the same side that is being swept (i.e. fighter sweeping with the left leg should reach to grab with the left arm).
Okuri Ashi Barai / Okuri Ashi Harai (Foot sweep)
Okuri ashi barai looks very similar to de ashi barai, even in its original context.
The sweeping motion itself is nearly identical to de ashi barai. The easiest positioning for okuri ashi barai is when the opponent moves laterally. The sweep is applied in the direction of this movement. For example, if the opponent and the fighter are moving to the right, then the sweep is applied by the fighter’s left leg (in other words, the sweep begins from left to right).
In the gif above, okuri ashi barai is also applied to the foot sweep as the opponent is moving sideways. In this situation, the throw is classified as okuri ashi barai because the foot sweep is intended to take out both legs, reflecting its Japanese name origins (sweeping as if to bring the foot towards the other foot).
Harai Tsurikomi Ashi / Sasae Tsurikomi Ashi (Lift – pull foot sweep / Support foot lift – pull throw )
Sasae Tsurikomi Ashi
Because the differences between harai tsurikomi ashi and sasae tsurikomi ashi are minor technical details that realistically do not apply in competition, both throws are introduced here.
In harai tsurikomi ashi, the leg motion is similar to that of de ashi barai. The difference is more visible in its original judo context
Harai Tsurikomiu ashi
back, the fighter takes a step forward with his right foot. It is crucial to take this step quickly, as the sweeping motion should start while the opponent is shifting his weight from his left to right foot.
In MMA in which the fighters do not wear a gi, the throw can be identified by the fighter’s position during executing and how the opponent falls over the sweeping leg head first.
Sasae tsurikomi ashi is a throw that looks similar to harai tsurikomi ashi
Like harai tsurikomi ashi, the opponent is flipped over the leg. However, in sasae tsurikomi ashi, the fighter places his right foot on the opponent’s ankle. There is no sweep.
The result is that sasae tsurikomi ashi is more akin to tripping the opponent. The momentum to throw mainly comes from the upper body and off balance.
Kosoto Gari (Minor outer reap)
To execute kosoto gari right-handed, the fighter hooks his right foot around the opponent’s heel. The hook should be applied from outside the opponent’s legs (as opposed to ouchi gari). To reap, pull the foot towards the left knee. Unlike a sweep that is executed from the hip and thus requires a straight leg, a hook is executed by bending at the knee.
This throw is most easily executed when the fighter is able to step slightly behind the opponent. Either the executor of the throw must step to the opponent’s side to set up the throw or he must wait for the opponent to come forward and pass him to the left side.
Because kosoto gari takes advantage of the opponent’s forward momentum and the hook to trip, the fighter is free to control the upper body in various positions.
Ouchi Gari (Major inner reap)
Ouchi gari is a backwards throw Applied in judo competition:
As in the opponent is thrown moving backwards. For a right handed fighter, the right leg hooks behind the opponent’s leg (left leg from the opponent’s point of view) from between the opponent’s legs. The fighter should aim for his calf to hit the opponent’s mid-calf. In order for this throw to be effective, the hooking leg should go no higher than behind the opponent’s mid knee. The hooked leg is then “reaped” – imagine drawing a backwards letter “C” with the toe – to take out the opponent’s left leg.
Ouchi gari requires the opponent to be off balanced backwards. The main point is for the opponent’s weight to shift on his heels. Preferably, the weight is starting to shift onto his left leg, so that when reaped, his axis of balance is taken out.
Furthermore, most ouchi gari are executed in two variations. One is an explosive ouchi gari. The opponent is off balanced and thrown in one motion, and the push backwards to off balance is applied simultaneously as the hook and reap. Second is a running ouchi gari (“ken ken” ouchi gari). The hook is applied, but the opponent has managed to maintain his balance. The fighter drives into his opponent by hopping on his left leg to close the distance between him and his opponent.
Below are two examples that highlight the versatility of ouchi gari as well as its adaptability in MMA.
Kouchi Gari (Minor inner reap)
Kouchi gari is another backwards throw like ouchi gari. Like ouchi gari, the fighter starts reaping from between the opponent’s legs. Unlike ouchi gari, the fighter catches the heel of the opponent’s leg (right leg from the opponent’s point of view) with the bottom of the foot.
A common mistake is for the fighter to bend the reaping leg at the knee, bringing the foot off the ground. While reaping, the foot should keep contact with the ground, because the momentum is generated from the hip, not the knee.
Although fighters may find the throw easier to execute on one side than the other, with kouchi gari (and other foot techniques) they should practice both sides, since even throws that are ineffective alone can be used to set up the next technique.
Hiza Guruma (Knee Wheel)
The upper body motion for hiza guruma follows sasae tsurikomi ashi closely. The fighter should have control of the opponent’s upper body to pull him forward onto his toes. To throw right handed, the fighter places his left foot on the opponent’s knee. This creates a pivot about which the opponent rotates and falls. The best situation to apply the throw is when the opponent is already moving forward.
In a no gi situation, the pull forward needs to be substituted with a clinch, bear hug, or arm around the neck. To create greater leverage, the fighter can step deeper with his right foot, planting the foot past the opponent’s left foot.
Even more so than in sasae tsurikomi ashi, the fighter executing the throw must pivot on his right plant foot and twist at the waist, as if to let the opponent slide past him.
Morote Gari (Double leg takedown)
Morote gari in its original judo context is a double leg takedown
The fighter lunges towards his opponent to grab both legs from behind the knees. He drives his opponent to the mat by pressing his upper body against the opponent’s waist. During the finish, the fighter should imagine moving through his opponent. The throw will fail if the fighter hesitates or drags his feet during the execution.
Although its motion is simple, inexperienced fighters disregard the timing to throw. They throw themselves against their opponent, hoping that their weight alone will drag the opponent down to the mat. In such cases, the opponent is generally able to retain their balance. At worst, the opponent can crush the fighter into the mat and establish a dominant position.
Another thing to note is that fighters may find certain types of opponents less susceptible to morote gari than others. For example, an opponent with experience in wrestling may fight with a more hunched stance, which can create distance between the fighter and legs, making it harder to reach for the legs.
Such a stance also results in a lower center of gravity, making it harder to off-balance with morote gari. An opponent more focused on striking, on the other hand, might have a more upright posture, leaving their legs susceptible to morote gari.
Te Guruma (Hand Wheel)
This is a throw that requires good timing and momentum, as the opponent is lifted off the ground. To set up the throw, step deeply with the left leg to the opponent’s right side. The step should bring the fighter as close to the opponent as possible, in order to place his center of gravity directly below the opponent.
As this step is taken, the left hand should grab around the upper thigh of the opponent’s right leg. As the opponent’s leg is lifted, the opponent’s weight should shift onto the fighter. As the fighter straightens his legs, he should lift the opponent into the air and start to turn his body while bringing his right foot back. This rotation causes the opponent to flip over and land on his back.
Perhaps the hardest part of this throw is the lift. Improperly done, this throw can cause injury to the fighter’s back. The key is using the opponent’s momentum. If this step is too far, the opponent cannot be lifted.
Also note that the blue gi judoka’s body is outstretched and his body is starting to tilt forwards. As the white gi judoka takes the second step with his left leg to position himself at 90 degrees to his opponent, he is using his partner’s forward momentum to lift.
Tani Otoshi (Valley Drop)
Tani otoshi is a sacrifice throw, in other words, the person executing the throw does so by throwing himself with his opponent. The first step to execute tani otoshi is to step close to the opponent with the left foot. With this step, the fighter should be at 90 degrees to the opponent on the opponent’s left side.
There should be close contact between the fighter’s torso and the opponent’s side. The fighter’s center of gravity should also be lower than the opponent. Next, the right leg is stretched behind both of the opponent’s legs. To finish the throw, the fighter should drive from the left foot and push the opponent from the hips. As the fighter lands on his right side, the opponent should be dragged to the ground on his back.
Sumi Gaeshi (Corner counter)
First, the fighter sits, as if aiming to sit between his opponent’s legs. This forces the opponent to bend over head first, and the opponent’s weight shifts forward onto his toes. The fighter adds to this forward momentum by hooking his right foot around the opponent’s thigh to help him over. The opponent is thrown, somersaulting over the fighter’s body.
When hooking with the right foot, the top of the foot should catch the opponent’s right thigh (i.e. the hooking leg should cross the body, more explicitly shown here:
When rolling backwards to complete the throw, it is important to keep close to the opponent to roll tightly. Extending the body while sitting back will cause the opponent to lean over, but will not throw him, and endanger the person who has executed the throw instead.
Another thing to note, is that the person executing the throw has to roll onto his back diagonally. His left hip has to touch the mat first. As he continues to throw, he has to roll from his left hip to right shoulder at an angle, rather than straight back.
Keeping close contact with the opponent’s body will allow the thrower to mount the opponent to the end. This is demonstrated here:
There is a technical difference in judo between the two throws – in sumi gaeshi, the thrower grabs the back of the gi; in hiki komi gaeshi, the thrower grabs the opponent’s belt.
Because this difference is inconsequential in MMA, this explanation has combined both throws under the category it is most known as, i.e. sumi gaeshi.
Ushiro Goshi (Back hip throw)
When the opponent is moving to throw the fighter forward, the fighter plant both feet firmly and bends his knees to scoop up the opponent from behind. At the same time, the fighter should bear hug the opponent at a slight angle so that the opponent starts to turn. The hips are thrusted forward as the knees are extended to lift the opponent into the air.
To throw right handed, the left knee sweeps the opponent’s legs so that his legs begin to come up. The opponent’s legs should come up so that the opponent is sideways across the fighter’s chest. When the opponent is dropped in the final stages of the throw, he should land on his side.
Ura Nage (Suplex)
Ura nage is another sacrifice throw, and one that looks similar to ushiro goshi. Like ushiro goshi, ura nage is mostly used as a counter technique in judo competition.
Because the throw requires little to no grip on the gi in its original form, many fighters have adopted ura nage to their repertoire in MMA. The entry into the throw is close to ushiro goshi. The main difference is that the opponent is not rotated in ura nage. Instead, the fighter drops on his back as if to bridge. This momentum brings his opponent over his head. Wrestlers may recognize this throw as a suplex
Like ushiro goshi, this throw works best when the thrower is already in a dominant position. For example, the most common entry is when the opponent is hunched over and the fighter has the opponent in a bear hug under the arms or with both arms pinned to the side.


")


")


